
Connect in 3 steps
The PingNitro client runs on your computer as a local proxy at 127.0.0.1, port 1081. Your terminal only needs to be pointed at that proxy. Orders and exchange settings stay unchanged; if your API key is restricted to IP addresses, add our exit addresses to it (see below).
The PingNitro app and your terminal run on the same computer, and the app stays open while you trade. Already installed? → to the terminal setup
- Get access. In the bot @pingnitrobot or in your
account press "Connect for free". There is no key to enter: in the app window click "Sign in with Telegram" and the app gets your key itself.
What you should see: the bot or your account shows your access and the date it is valid until.
- Download and install the app. Choose your system:
Continue on your computer — send the link to Telegram
The app works on Windows and macOS; a trading terminal can't be connected through it from a phone. Open the link on the computer where your terminal is.
Run
PingNitro-Setup.exe→ "Install" (no administrator rights needed; shortcuts in the Start menu and on the desktop, autostart, uninstall via "Apps"). In the app window click "Sign in with Telegram" — the bot opens; press "Start", then "✅ Sign in — it's me". A PingNitro icon appears near the clock: a green dot means the route works, a red one means it doesn't; right-click opens the menu (open the window, turn the route off, restart, quit).If Windows shows "Windows protected your PC" — click "More info" → "Run anyway" (it contains the official open-source clients shadowsocks-rust and sing-box). You don't need to turn Windows protection off. Didn't work — @whiteping_support or support@pingnitro.com.- Open Terminal (⌘ Space → "Terminal"), paste the command
and press Enter. The app downloads, verifies its own integrity, installs into Applications and opens; no Mac password needed.
curl -fsSL https://pingnitro.com/mac.sh | bash - In the PingNitro window click "Sign in with Telegram" → in the bot press "Start", then "✅ Sign in — it's me". From then on PingNitro runs in the background and starts by itself when you log in.
- Instead of the command you can install from a DMG file — step by step, including the "Open Anyway" step, on the PingNitro for Mac page.
What you should see: the app window says "Route on" and "Working · Binance … ms", and the PingNitro icon is near the clock (on Mac — in the menu bar). - Open Terminal (⌘ Space → "Terminal"), paste the command
- Set the proxy in your terminal — choose yours below. It is the same everywhere: type HTTP, address 127.0.0.1,
port 1081, login and password empty. Then be sure to restart the terminal (close it and open it again) — every time you
change the proxy: otherwise connections that are already open stay direct, not through PingNitro.
What you should see: the terminal shows a connection to the exchange.
Your terminal
Menu and field names below are translated from the terminals' Russian-language interfaces; in an English-language build the wording may differ slightly. If you can't find an item, contact support.
CScalp
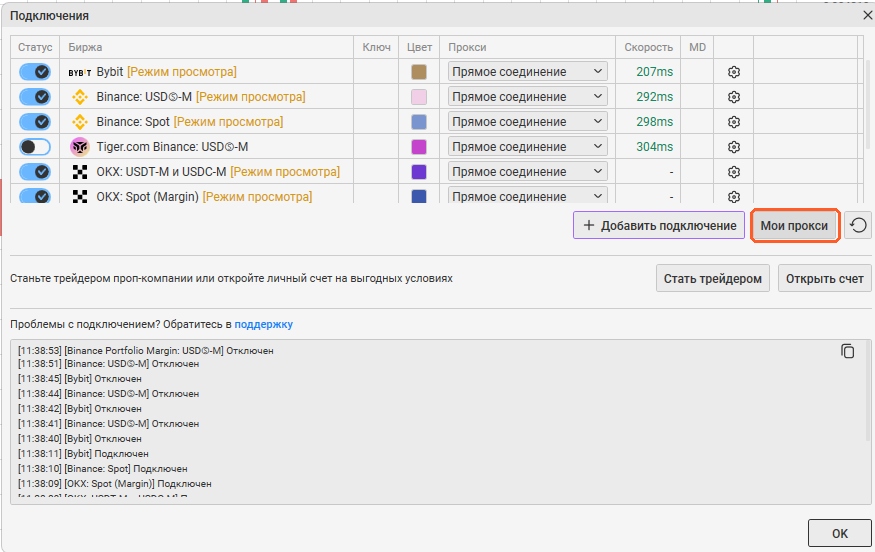
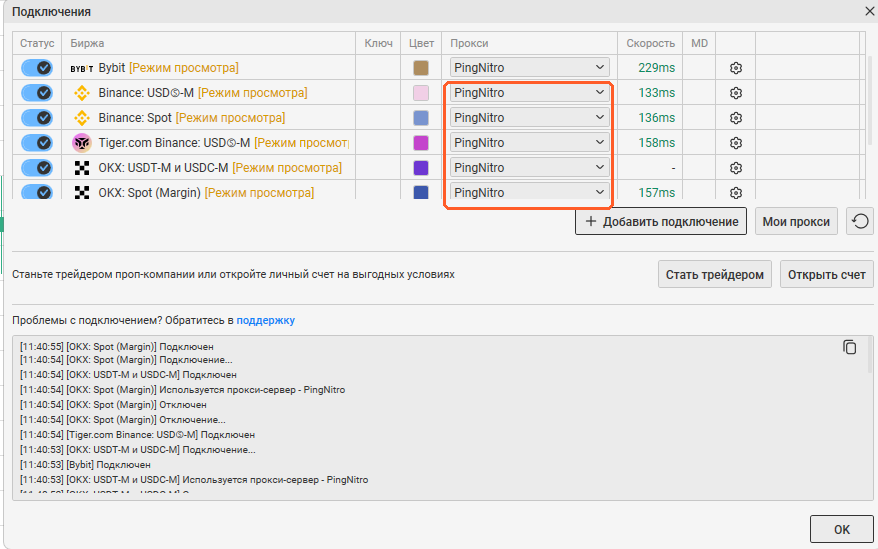
- Open the "Connections" window (CScalp settings → "Connections") → the "My proxies" button.
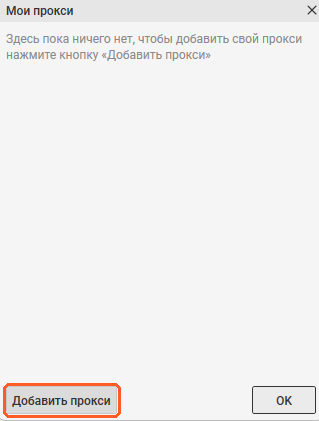
What you should see: the "My proxies" window is open.
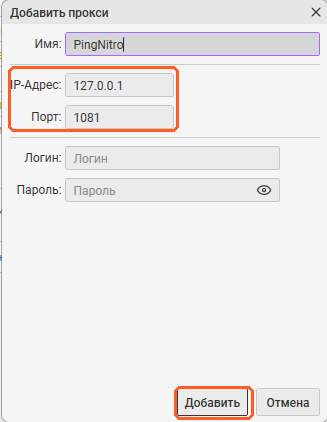
- "Add proxy": any name (for example,
PingNitro), IP address127.0.0.1, port1081, leave login and password empty → "Add".What you should see: PingNitro is in the "My proxies" list. - In the "Connections" window, in the "Proxy" column of Binance (USDⓈ-M and Spot), OKX and other exchanges,
select
PingNitro. Leave Bybit and BingX on "Direct connection" — the route to their servers is shorter that way. The proxy is set for each connection separately — check every row of the list (it scrolls): Binance USDⓈ-M, Binance Spot, OKX and the rest. The PingNitro app does not yet tell CScalp connections apart and says "CScalp — full stream via PingNitro" even if only one of them goes through PingNitro.What you should see: the "Proxy" column shows PingNitro for every exchange you need, and the "Speed" column shows a noticeably lower latency to Binance. - Be sure to restart CScalp (close it and open it again) — every time you change the proxy:
otherwise the connections that are already open stay direct. Done — compare the feed before and after (for example, with the test on our site).
What you should see: the terminal shows a connection to the exchange.
127.0.0.1, port 1081, login and password empty → "Add".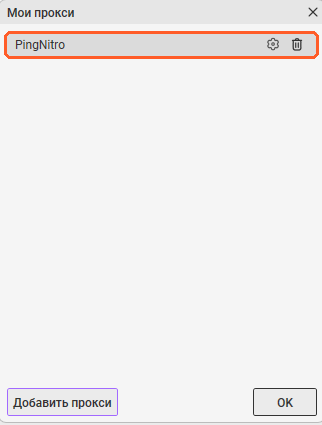
Tiger.com (Tiger.Trade)
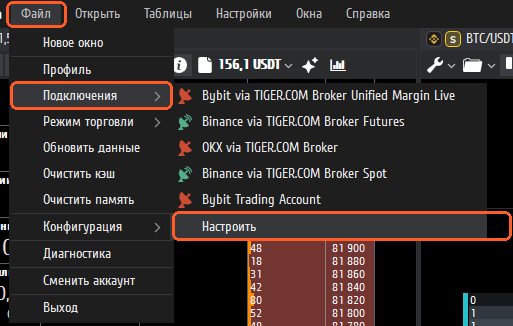
127.0.0.1:1081.- Main menu "File" → "Connections" → "Configure".
What you should see: the "Connections" window with your exchanges is open.
- In the "Connections" window click the "Proxy" button (top right) → "Add proxy": any name
(for example,
1081), "Proxy settings" —127.0.0.1:1081, login and password empty → "Apply".What you should see: your proxy 127.0.0.1:1081 is in the proxy list. - In the connections list, in the "Proxy" column of every Binance connection (futures and spot), select
the proxy you created.
What you should see: the "Proxy" column of the Binance connections shows your proxy (1081 in the screenshot).
- If the Binance connection settings have the checkboxes "Use proxy for market data" (feed and order book —
the main gain), "…for user data" and "…for orders", turn on all three. For OKX — both.
What you should see: both the feed with the order book and your orders go through the proxy.
- Be sure to restart Tiger.com (close it and start it again) — every time you change the proxy:
otherwise connections that are already open stay direct, not through the proxy.
What you should see: the terminal shows a connection to the exchange.
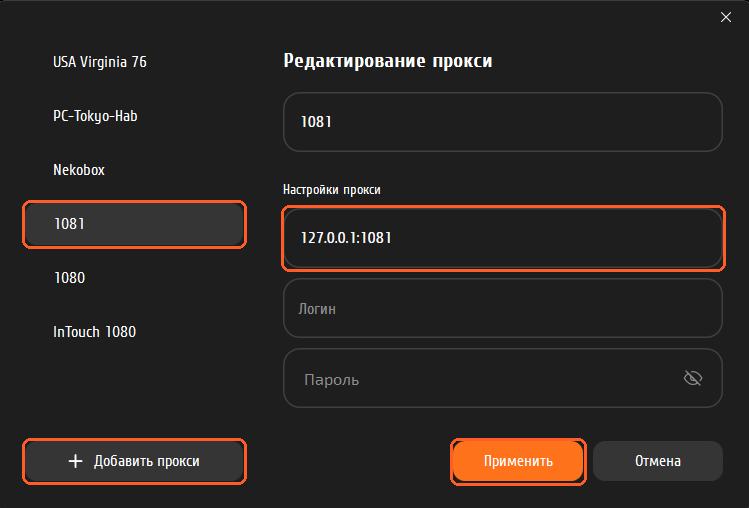
127.0.0.1:1081, login and password empty → "Apply".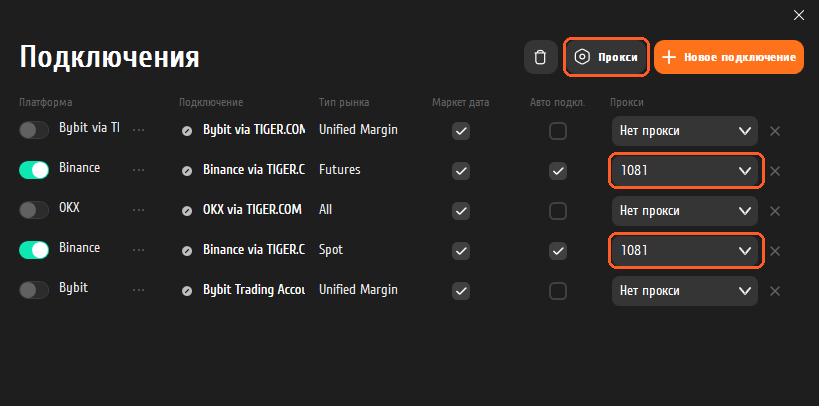
Vataga.terminal (EasyScalp)
- The gear icon in the program header → the "Proxy" tab → "Add proxy".
What you should see: the "Proxy" tab is open.
- Host (the "Address" field) —
127.0.0.1, Port —1081, login and password empty. Save. (The switch for Vataga's own services, «Для сервисов Vataga…» in the Russian interface, is not needed — leave it as it is.)What you should see: the proxy 127.0.0.1:1081 is saved. - The "Connections" tab → choose the exchange connection → in its "Proxy" field choose the proxy you created.
What you should see: the exchange connection has the proxy you created selected.
- "Proxy mode" — "Full stream" (both the feed with the order book and your orders go through the route; in the "Orders only"
mode the feed stays slow).
What you should see: the proxy mode is "Full stream".
- Click the button in the connection header — the green "Connected" indicator lights up. If the exchange was
already connected or you changed the proxy, be sure to restart Vataga (close it and open it again).
What you should see: the green "Connected" indicator is lit in the header.
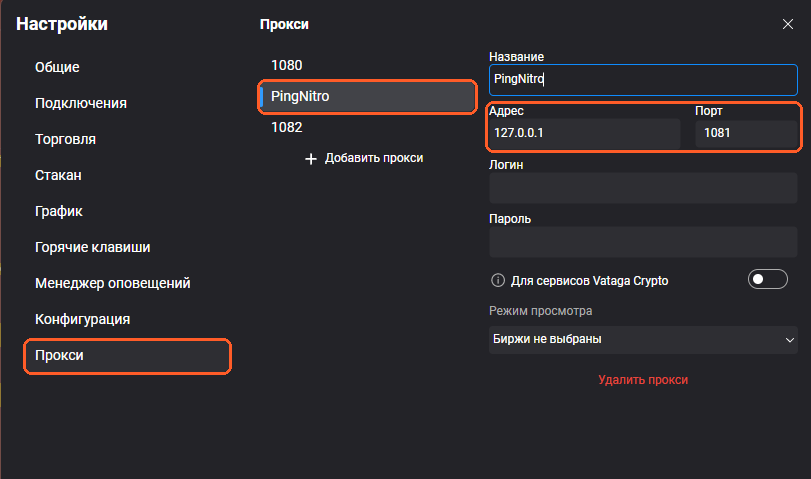
127.0.0.1, port 1081, login and password empty.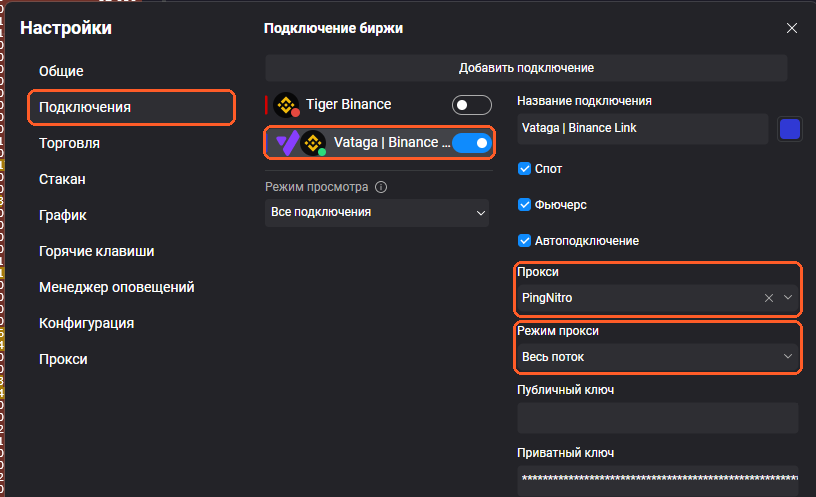
MetaScalp
- Settings → the "Proxy" tab → the "Add proxy server" section.
What you should see: the "Add proxy server" section is open.
- Name —
PingNitro, IP address —127.0.0.1, port —1081, login and password empty → "Add".What you should see: the proxy PingNitro (127.0.0.1:1081) is added. - In the exchange connection, choose
PingNitroin the "Proxy" drop-down.What you should see: the exchange connection has PingNitro selected. - Be sure to restart MetaScalp (close it and open it again) — every time you change the proxy:
otherwise connections that are already open stay direct.
What you should see: the exchange label is green — the terminal is connected to the exchange.
Any other terminal
Any program that lets you set a proxy for the exchange connection will do: look for "Proxy" in the connection settings.
Type — HTTP (if you have a choice, SOCKS5 works too), address 127.0.0.1, port 1081,
no login. If the proxy can be enabled separately for "market data" and "orders", enable it for both — the feed gets faster only when it goes
through the route. Once you have set or changed the proxy, be sure to restart the terminal (close it and open it again). If the
proxy is set for each connection separately, check all of them.
Your own bot or script
# Python + ccxt
import ccxt
ex = ccxt.binanceusdm({"apiKey": "...", "secret": "..."})
ex.httpsProxy = "http://127.0.0.1:1081/"   # REST
ex.wsProxy    = "http://127.0.0.1:1081/"   # WebSocket (ccxt.pro)

# curl - check the route
curl -x http://127.0.0.1:1081 https://fapi.binance.com/fapi/v1/time
The PingNitro client accepts HTTP, SOCKS5 and SOCKS4 on a single port, 1081.
How to check that it works
- The PingNitro icon near the clock is green, and the app window (icon → "Open") says "Route on" with "Working · Binance … ms" at the top. If there is no icon (it may be under the ^ arrow), open PingNitro from the Start menu; on a Mac, use the menu-bar icon or launch PingNitro again: it checks the route and shows a status window.
- Run the test on our site before and after — the table shows the feed latency for your connection.
- In the terminal, look at the ping / feed latency in the connection panel. In our measurements the Binance Futures feed took 69–78 ms via the route instead of 144–145 ms direct; in your city the numbers will differ — see the measurements by city.
Before you install — in short
Does the app have to stay open?
Yes, while you trade: the PingNitro app gives your terminal the proxy 127.0.0.1:1081, and without it the terminal won't connect to the exchange. It runs in the background and starts with the system — the PingNitro icon is near the clock (on Mac — in the menu bar).
Which systems does it work on?
Windows 10/11 and macOS 13+ on a Mac with an Apple Silicon processor (M1 or newer). There is no app for phones or Intel Macs.
What affects latency?
Your city, your provider and the exchange — we don't promise a number in advance. Our measurements are on the "How it works" page; measure your own latency on the test page before and after connecting. If a program routes all of your computer's traffic through itself (a tunnel, a proxy in "all traffic" mode), add PingNitro to its exclusions (the sslocal and sing-box files) or turn it off while you trade.
Do you need my exchange API keys?
No. We never ask for your API keys. Don't enter them anywhere except your terminal and don't send them to anyone — even to people writing on behalf of PingNitro. The connection between your terminal and the exchange is encrypted by the exchange itself: your keys and orders are not visible to us.
All questions · support — @whiteping_support or support@pingnitro.com
If it doesn't work
This checks one of our routes. If it doesn't work for you while this looks fine, write to support: @whiteping_support or support@pingnitro.com.
The terminal won't connect to the exchange after I set the proxy
- Check that PingNitro is running (the icon near the clock; it may be hidden under the ^ arrow) — without it the proxy 127.0.0.1:1081 does not work.
- Open the app window (icon → "Open"). If it says "No connection" or "Proxy not responding", tell us in the bot what you see.
- Check the proxy type: in CScalp and Tiger.com it is HTTP. The port is 1081 (not 1080).
- After changing the proxy, be sure to restart the terminal (close it and open it again).
The app says the terminal goes direct, or "only orders via PingNitro, market data direct"
Check that the proxy is selected in the exchange connection (Vataga — "Full stream" mode, Tiger.com — the "Use proxy for market data" checkbox, CScalp — PingNitro on every connection). Then be sure to restart the terminal (close it and open it again): connections opened before the proxy change keep going direct, not through PingNitro.
Other network programs are running (tunnels, proxies in "all traffic" mode) — latency got worse
A program that routes everything through itself in "all traffic" (TUN) mode also captures our client's traffic, so the path to the exchange gets longer.
Add sslocal.exe (and sing-box.exe, which runs in the "Poor network (UDP)" mode) to that program's exclusions (the exclusions / split tunneling section, by process) or turn it off while you trade.
Our client does not touch the rest of your internet.
Microsoft Defender or another antivirus removed sslocal.exe or sing-box.exe
These are official open-source clients: shadowsocks-rust (sslocal.exe, GitHub) and sing-box (sing-box.exe, the "Poor network (UDP)" mode). Add the PingNitro folder to your antivirus exclusions and download the installer again in your account or in the bot (the "🪟 App for Windows" button).
Do I need to change anything in my exchange API keys?
It depends on IP restriction. Binance allows trading with a regular (HMAC) key only when the key is restricted to IP addresses — without it such a key can only read data (Binance FAQ, updated 20 March 2025). So your trading key most likely already has an IP list: add all seven of our exit addresses to it:
57.182.161.23895.85.94.20695.85.94.13285.234.83.15685.234.83.12995.85.94.236202.182.97.123
They are copied one per line — paste them into the exchange's field one at a time.
The addresses are permanent and the route picks the best of them itself; without them the exchange will reject orders sent through the route. A key without IP restriction (an Ed25519/RSA key or one with Binance's default security controls disabled) needs no changes.
Mind the “go direct” fallback (the app setting “Go direct if the route is down”, on by default): when the route is unavailable the terminal connects from your own address — the feed keeps working, and the exchange accepts orders only if your own address is on the key's list too.
The feed is jittery on mobile internet or lossy Wi-Fi
In the app settings (version 2.4.0 and newer) turn on "Poor network (UDP)": the link to the entry runs over UDP, which keeps the feed smoother when packets are lost. The mode is off by default; if UDP doesn't get through to us, PingNitro falls back to the normal mode by itself.
Bybit / BingX are not sped up
Bybit and BingX servers are in Singapore — via our exit the path to them is longer than direct, so the PingNitro client sends them directly, outside the route, and the latency is the same as without a proxy.
How to switch it off
Remove the proxy in your terminal's connection settings and close the client window — everything goes direct again, as before.